# 5.TodoList編
- TodoListを作る
# ゴール
- 繰り返し項目をリスト表示できるようになる
- 入力内容を取得して扱えるようになる
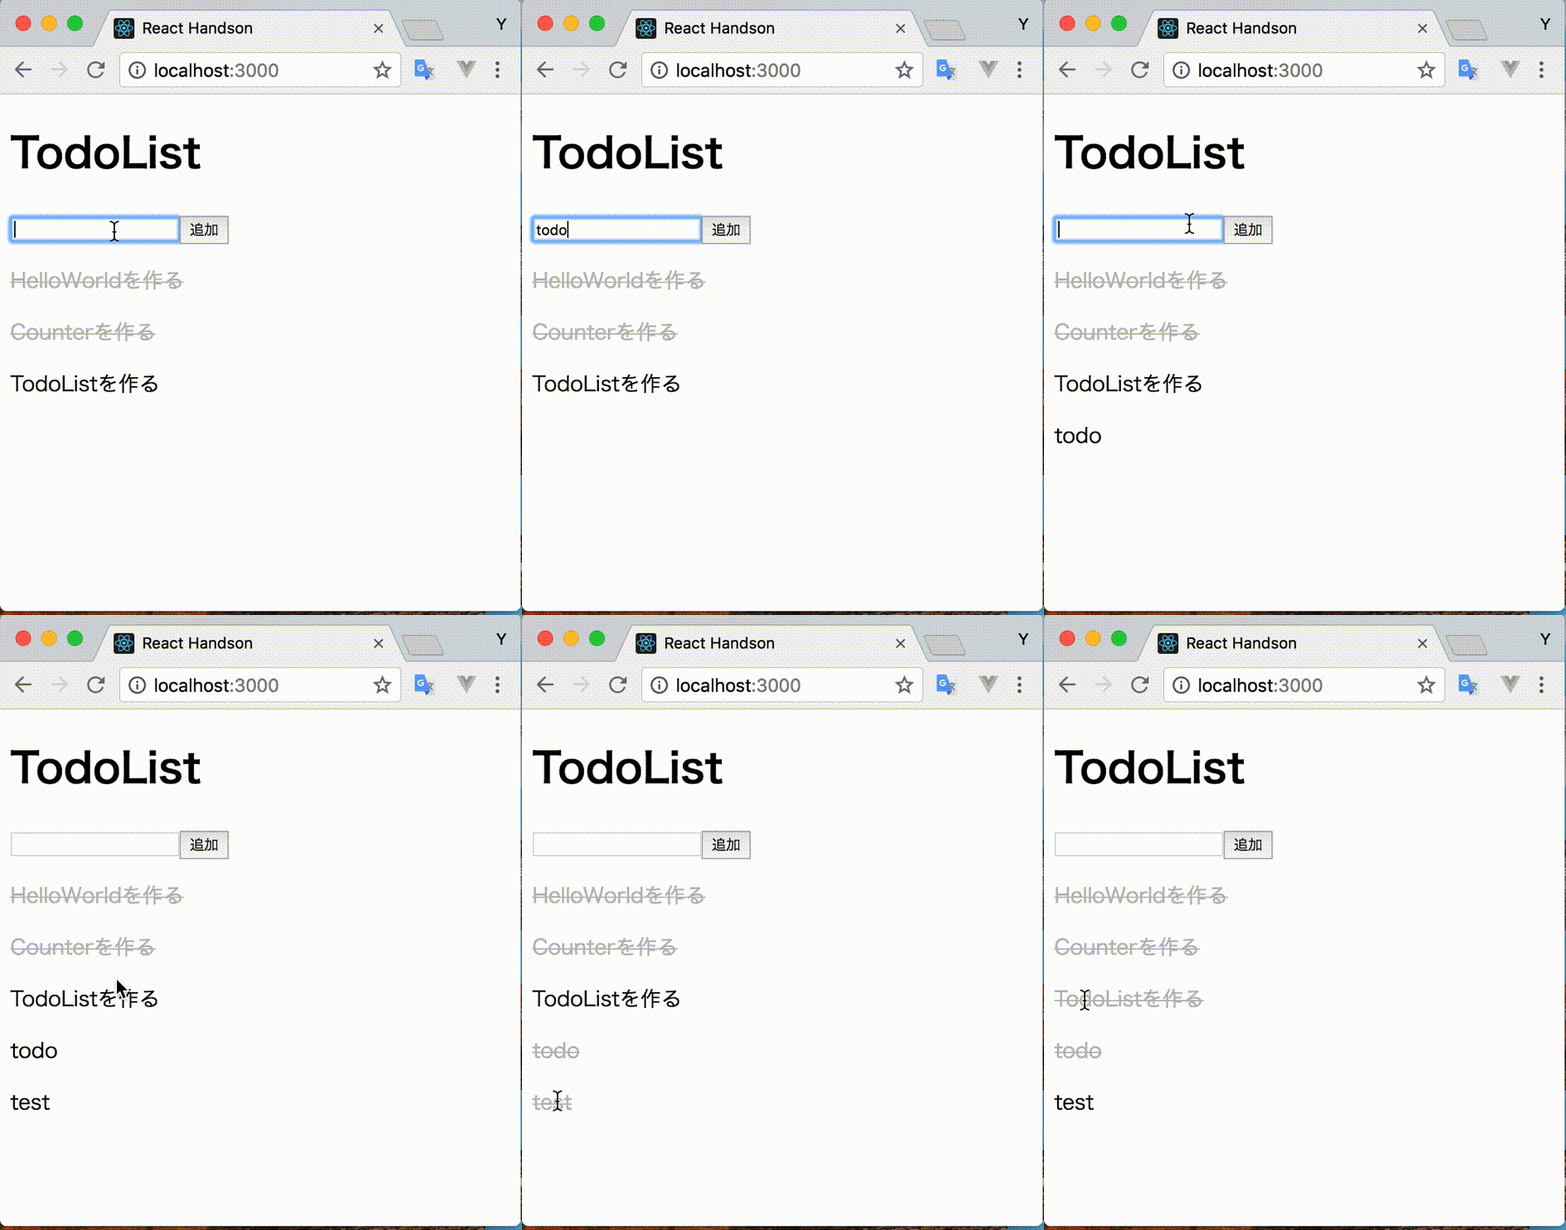
# 完成形
# やること
- TodoListを表示する
- Todoの完了/未完了を切り替える
- 新しいTodoを追加する
# TodoListを表示する
# TodoListコンポーネントを作成
src/components/TodoList.jsを作成する- まずはTodoListの文字列を返すだけのものを作成
import React from 'react';

function TodoList() {
  return (
    <div>
      <h1>TodoList</h1>
    </div>
  );
}

export default TodoList;
1
2
3
4
5
6
7
8
9
10
11
2
3
4
5
6
7
8
9
10
11
- TodoListコンポーネントを表示するように
App.jsを修正
import React from 'react';
import TodoList from './components/TodoList'; // importを追加

function App() {
  return <TodoList />; // TodoListコンポーネントを使用
}

export default App;
1
2
3
4
5
6
7
8
2
3
4
5
6
7
8
- ここまででは画面に
TodoListと表示されるだけ
# TodoListの定義
- StateとしてTodoのリストを保持するようにする
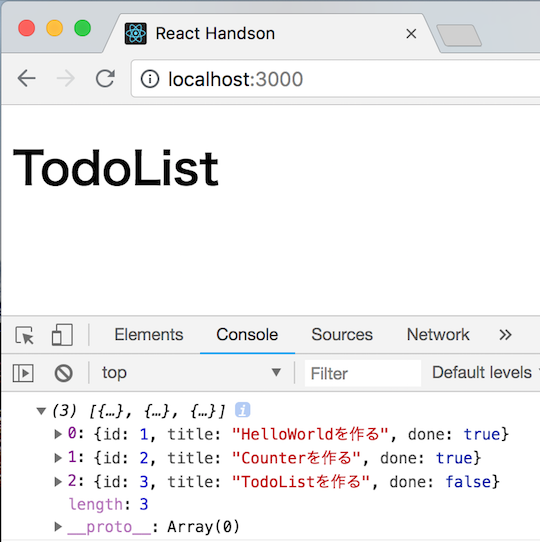
todoListというStateを定義し初期値としてdefaultTodoを設定するconsole.logでStateに値を設定できていることを確認する
import React from 'react';

// TodoListのデフォルト値の定義を追加
const defaultTodo = [
  { id: 1, title: 'HelloWorldを作る', done: true },
  { id: 2, title: 'Counterを作る', done: true },
  { id: 3, title: 'TodoListを作る', done: false }
];

function TodoList() {
  const [todoList, setTodoList] = React.useState(defaultTodo);
  console.log(todoList); // stateの値を確認する処理を追加
  return (
    <div>
      <h1>TodoList</h1>
    </div>
  );
}

export default TodoList;
1
2
3
4
5
6
7
8
9
10
11
12
13
14
15
16
17
18
19
20
2
3
4
5
6
7
8
9
10
11
12
13
14
15
16
17
18
19
20
- TodoListは
id、title、doneの3つのフィールドからなるTodoの配列とする
TIP
- ブラウザ上でF12(もしくは右クリック->検証)を押すと開発者ツールを出すことができる
- Consoleタブを選択すると
console.log()の出力を確認することができる - 出力のされ方はブラウザによって多少の差異がある
# TodoListを画面に表示する
- Stateで保持しているTodoListを画面に表示する
import React from 'react';

const defaultTodo = [
  { id: 1, title: 'HelloWorldを作る', done: true },
  { id: 2, title: 'Counterを作る', done: true },
  { id: 3, title: 'TodoListを作る', done: false },
];

function TodoList() {
  const [todoList, setTodoList] = React.useState(defaultTodo);
  return (
    <div>
      <h1>TodoList</h1>
      {/* TodoListの要素数分だけpタグを生成する処理を追加 */}
      {todoList.map(todo => (
        <p key={todo.id}>{todo.title}</p>
      ))}
    </div>
  );
}

export default TodoList;
1
2
3
4
5
6
7
8
9
10
11
12
13
14
15
16
17
18
19
20
21
22
2
3
4
5
6
7
8
9
10
11
12
13
14
15
16
17
18
19
20
21
22
.mapを使うことでTodoの数だけpタグを生成している- 今回のようにループ処理で同じ形式のタグを複数生成する場合は
key属性に一意な値を設定する必要がある- Reactの特徴である仮想DOMを用いたレンダリングの最適化を実現するために使われる
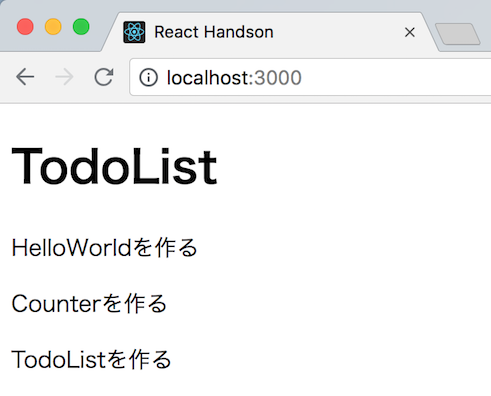
- ここまででTodoの一覧が表示されるようになった
# Todoの完了/未完了を切り替える
- 次は表示されたTodoをクリックすることでTodoの完了/未完了を切り替えられるようにする
# 完了時の見た目を修正する
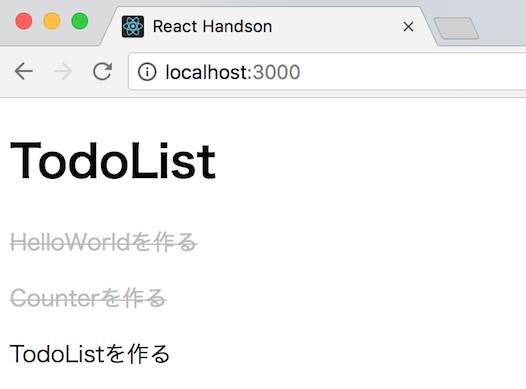
- 今のままでは完了も未完了も同じ見た目になっているので、完了の場合に取り消し線がつくようにしておく
- styleを定義し、doneがtrueの場合のみ適用されるようにする
import React from 'react';

const defaultTodo = [
  { id: 1, title: 'HelloWorldを作る', done: true },
  { id: 2, title: 'Counterを作る', done: true },
  { id: 3, title: 'TodoListを作る', done: false },
];

// styleの定義を追加
const styles = {
  done: {
    color: '#bbb',
    textDecoration: 'line-through',
  },
};

function TodoList() {
  const [todoList, setTodoList] = React.useState(defaultTodo);
  return (
    <div>
      <h1>TodoList</h1>
      {todoList.map(todo => (
        // style属性を追加
        // doneがtrueならstyleを適用、falseなら何も適用しない
        <p key={todo.id} style={todo.done ? styles.done : null}>
          {todo.title}
        </p>
      ))}
    </div>
  );
}

export default TodoList;
1
2
3
4
5
6
7
8
9
10
11
12
13
14
15
16
17
18
19
20
21
22
23
24
25
26
27
28
29
30
31
32
33
2
3
4
5
6
7
8
9
10
11
12
13
14
15
16
17
18
19
20
21
22
23
24
25
26
27
28
29
30
31
32
33
TIP
- styleの適用部分で三項演算子を使っている
(条件式) ? (trueの時の値) : (falseの時の値);
- doneがtrueのTodoに取り消し線が表示されるようになった
# クリックされたことを検知する
- Todoを表示するpタグに
onClick属性を追加する - どのTodoがクリックされたか判別できるように
id属性も追加しておく toggleComplete関数を追加しクリックした際に呼び出されるようにする
import React from 'react';

const defaultTodo = [
  { id: 1, title: 'HelloWorldを作る', done: true },
  { id: 2, title: 'Counterを作る', done: true },
  { id: 3, title: 'TodoListを作る', done: false },
];

const styles = {
  done: {
    color: '#bbb',
    textDecoration: 'line-through',
  },
};

function TodoList() {
  const [todoList, setTodoList] = React.useState(defaultTodo);

  // toggleComplete関数を追加
  const toggleComplete = (event) => {
    alert(event.target.id); // event.target.idでクリックされた要素のid属性を取得できる
  };

  return (
    <div>
      <h1>TodoList</h1>
      {todoList.map(todo => (
        // id属性とonClick属性を追加
        <p
          key={todo.id}
          style={todo.done ? styles.done : null}
          id={todo.id}
          onClick={toggleComplete}
        >
          {todo.title}
        </p>
      ))}
    </div>
  );
}

export default TodoList;
1
2
3
4
5
6
7
8
9
10
11
12
13
14
15
16
17
18
19
20
21
22
23
24
25
26
27
28
29
30
31
32
33
34
35
36
37
38
39
40
41
42
2
3
4
5
6
7
8
9
10
11
12
13
14
15
16
17
18
19
20
21
22
23
24
25
26
27
28
29
30
31
32
33
34
35
36
37
38
39
40
41
42
- Todoの文字列をクリックすると、そのTodoのidがalertで表示される
# クリックされたTodoのdoneを切り替える
- クリックしたTodoのdoneの値を更新する
import React from 'react';

const defaultTodo = [
  { id: 1, title: 'HelloWorldを作る', done: true },
  { id: 2, title: 'Counterを作る', done: true },
  { id: 3, title: 'TodoListを作る', done: false },
];

const styles = {
  done: {
    color: '#bbb',
    textDecoration: 'line-through',
  },
};

function TodoList() {
  const [todoList, setTodoList] = React.useState(defaultTodo);

  const toggleComplete = event => {
    // 属性の値は全て文字列で返却されるので数値型に変換する
    const id = Number(event.target.id);

    // Stateに保持しているtodoListに対してループ処理
    const newTodoList = todoList.map(todo => {
      // クリックされたtodoのidと一致したらdoneのtrue/falseを反転させる
      if (todo.id === id) todo.done = !todo.done;
      return todo;
    });

    // 更新後のtodoListでStateを更新する
    setTodoList(newTodoList);
  };

  return (
    <div>
      <h1>TodoList</h1>
      {todoList.map(todo => (
        <p
          key={todo.id}
          style={todo.done ? styles.done : null}
          id={todo.id}
          onClick={toggleComplete}
        >
          {todo.title}
        </p>
      ))}
    </div>
  );
}

export default TodoList;
1
2
3
4
5
6
7
8
9
10
11
12
13
14
15
16
17
18
19
20
21
22
23
24
25
26
27
28
29
30
31
32
33
34
35
36
37
38
39
40
41
42
43
44
45
46
47
48
49
50
51
2
3
4
5
6
7
8
9
10
11
12
13
14
15
16
17
18
19
20
21
22
23
24
25
26
27
28
29
30
31
32
33
34
35
36
37
38
39
40
41
42
43
44
45
46
47
48
49
50
51
TIP
- JavaScriptでは等価演算子は
===を使う - 否定の場合は
!==
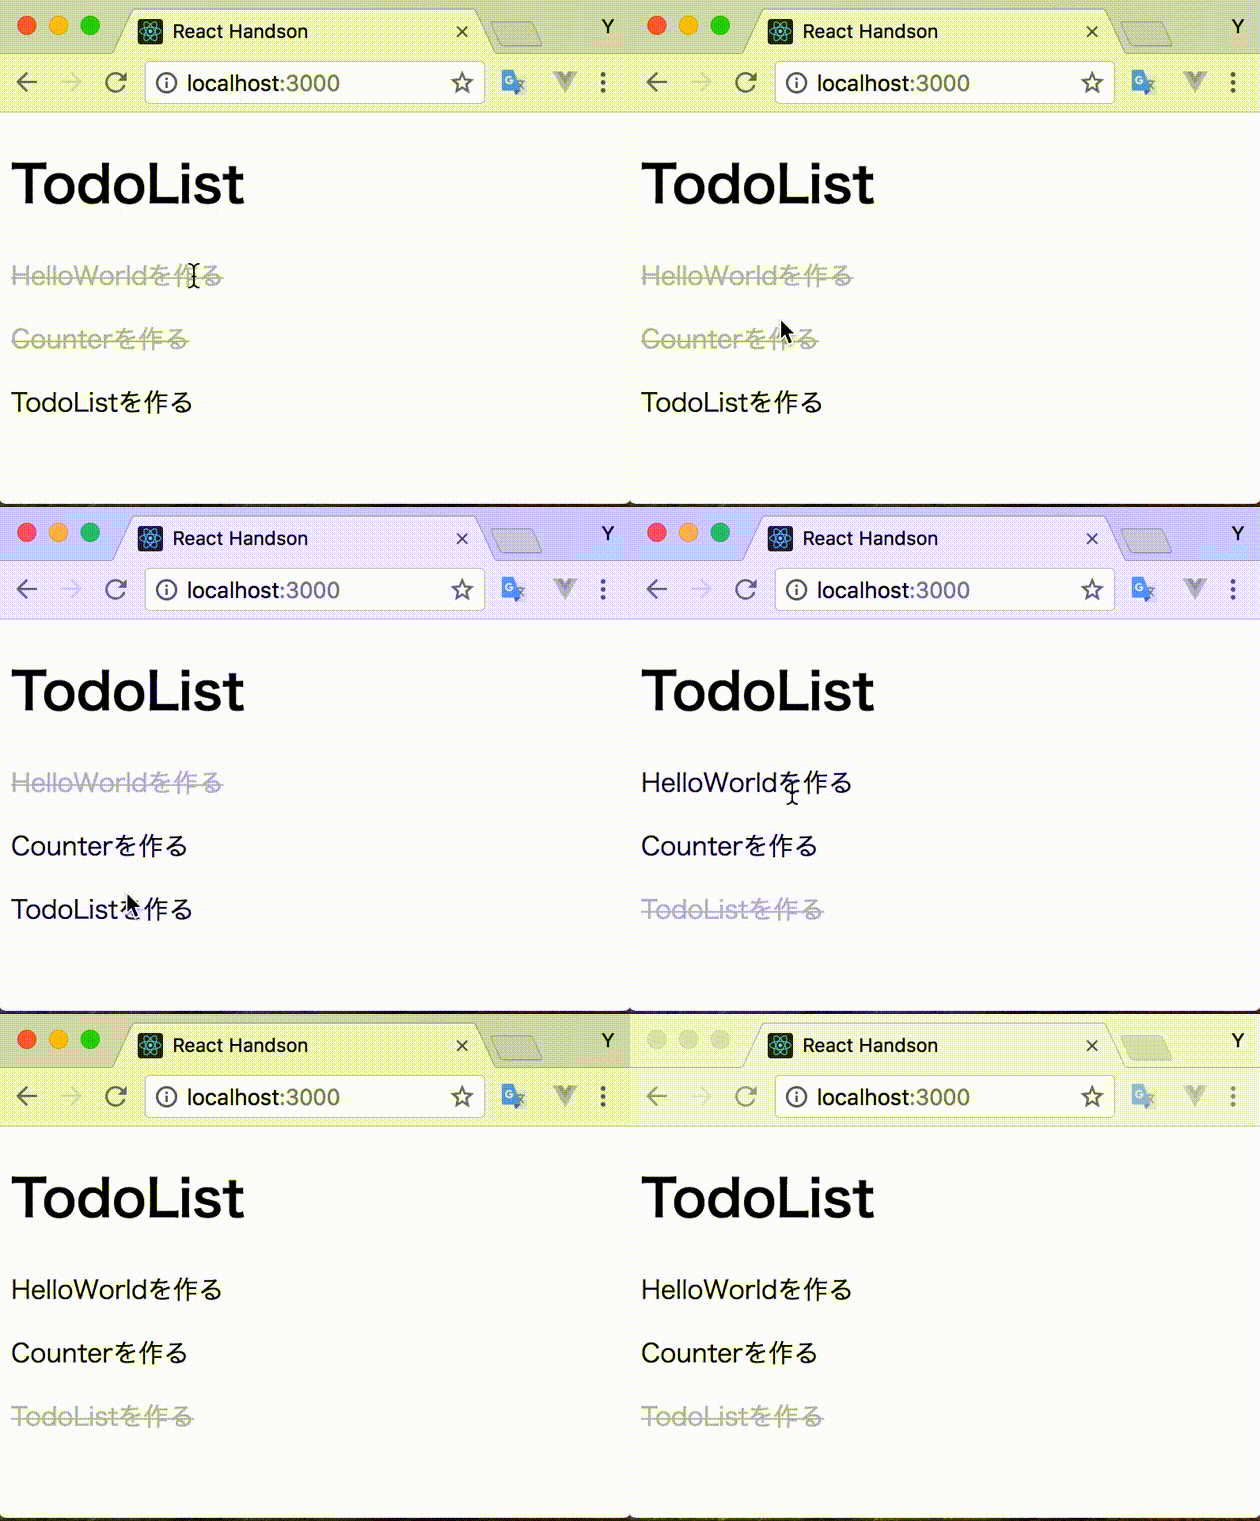
- ここまでできるとTodoの完了/未完了をクリックすることで切り換えられるようになる
# 新しいTodoを追加する
- ここまででTodoの完了/未完了を管理できるようになった
- 次は新しくTodoを追加できるようにする
# 入力フォームの作成
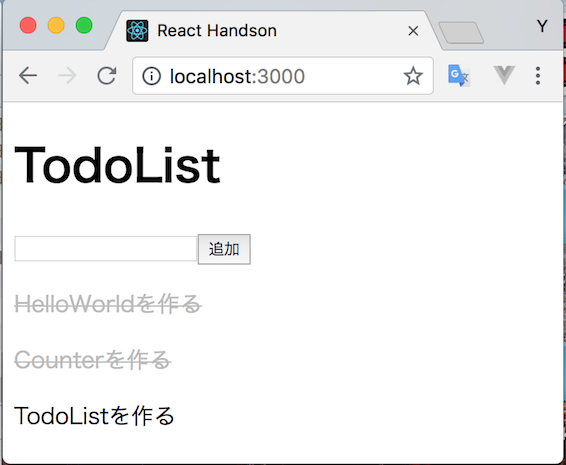
- 追加したいTodoの内容を入力するフォームと追加ボタンを配置する
import React from 'react';

const defaultTodo = [
  { id: 1, title: 'HelloWorldを作る', done: true },
  { id: 2, title: 'Counterを作る', done: true },
  { id: 3, title: 'TodoListを作る', done: false },
];

const styles = {
  done: {
    color: '#bbb',
    textDecoration: 'line-through',
  },
};

function TodoList() {
  const [todoList, setTodoList] = React.useState(defaultTodo);

  const toggleComplete = event => {
    const id = Number(event.target.id);

    const newTodoList = todoList.map(todo => {
      if (todo.id === id) todo.done = !todo.done;
      return todo;
    });

    setTodoList(newTodoList);
  };

  return (
    <div>
      <h1>TodoList</h1>
      {/* 入力域とボタンを追加 */}
      <p>
        <input />
        <button>追加</button>
      </p>
      {todoList.map(todo => (
        <p
          key={todo.id}
          style={todo.done ? styles.done : null}
          id={todo.id}
          onClick={toggleComplete}
        >
          {todo.title}
        </p>
      ))}
    </div>
  );
}

export default TodoList;
1
2
3
4
5
6
7
8
9
10
11
12
13
14
15
16
17
18
19
20
21
22
23
24
25
26
27
28
29
30
31
32
33
34
35
36
37
38
39
40
41
42
43
44
45
46
47
48
49
50
51
52
2
3
4
5
6
7
8
9
10
11
12
13
14
15
16
17
18
19
20
21
22
23
24
25
26
27
28
29
30
31
32
33
34
35
36
37
38
39
40
41
42
43
44
45
46
47
48
49
50
51
52
# 入力内容を取得する
import React from 'react';

const defaultTodo = [
  { id: 1, title: 'HelloWorldを作る', done: true },
  { id: 2, title: 'Counterを作る', done: true },
  { id: 3, title: 'TodoListを作る', done: false },
];

const styles = {
  done: {
    color: '#bbb',
    textDecoration: 'line-through',
  },
};

function TodoList() {
  const [todoList, setTodoList] = React.useState(defaultTodo);

  // 入力域の参照を定義
  const input = React.useRef(null);

  // addTodo関数を追加
  const addTodo = () => {
    alert(input.current.value); // 入力内容はinput.current.valueで取得できる
  };

  const toggleComplete = event => {
    const id = Number(event.target.id);

    const newTodoList = todoList.map(todo => {
      if (todo.id === id) todo.done = !todo.done;
      return todo;
    });

    setTodoList(newTodoList);
  };

  return (
    <div>
      <h1>TodoList</h1>
      <p>
        {/* 入力域を参照できるようにref属性を追加 */}
        <input ref={input} />
        {/* onClick属性を追加 */}
        <button onClick={addTodo}>追加</button>
      </p>
      {todoList.map(todo => (
        <p
          key={todo.id}
          style={todo.done ? styles.done : null}
          id={todo.id}
          onClick={toggleComplete}
        >
          {todo.title}
        </p>
      ))}
    </div>
  );
}

export default TodoList;
1
2
3
4
5
6
7
8
9
10
11
12
13
14
15
16
17
18
19
20
21
22
23
24
25
26
27
28
29
30
31
32
33
34
35
36
37
38
39
40
41
42
43
44
45
46
47
48
49
50
51
52
53
54
55
56
57
58
59
60
61
2
3
4
5
6
7
8
9
10
11
12
13
14
15
16
17
18
19
20
21
22
23
24
25
26
27
28
29
30
31
32
33
34
35
36
37
38
39
40
41
42
43
44
45
46
47
48
49
50
51
52
53
54
55
56
57
58
59
60
61
- 入力域の参照を取得
const input = React.useRef(null);で入力域の参照を定義<input ref={input} />でref属性にセットすることで、変数inputに入力域の情報が格納される
- 追加ボタンクリック時の挙動
<button onClick={addTodo}>追加</button>でclick時にaddTodo関数を呼び出すようにしている
- ここまでで追加ボタンを押すと入力した内容がalertに表示されるようになった
# 入力内容をTodoListに追加
import React from 'react';

const defaultTodo = [
  { id: 1, title: 'HelloWorldを作る', done: true },
  { id: 2, title: 'Counterを作る', done: true },
  { id: 3, title: 'TodoListを作る', done: false },
];

const styles = {
  done: {
    color: '#bbb',
    textDecoration: 'line-through',
  },
};

function TodoList() {
  const [todoList, setTodoList] = React.useState(defaultTodo);

  const input = React.useRef(null);

  const addTodo = () => {
    // 新しいtodoを組み立てる
    const todo = {
      id: todoList.length + 1,
      title: input.current.value, // 入力内容をtitleにセット
      done: false,
    };

    // [...state.todoList, todo]とすることで現在のtodoListの配列の最後尾に新しいtodoを追加できる
    setTodoList([...todoList, todo]);

    // 入力域を空にする
    input.current.value = '';
  };

  const toggleComplete = event => {
    const id = Number(event.target.id);

    const newTodoList = todoList.map(todo => {
      if (todo.id === id) todo.done = !todo.done;
      return todo;
    });

    setTodoList(newTodoList);
  };

  return (
    <div>
      <h1>TodoList</h1>
      <p>
        <input ref={input} />
        <button onClick={addTodo}>追加</button>
      </p>
      {todoList.map(todo => (
        <p
          key={todo.id}
          style={todo.done ? styles.done : null}
          id={todo.id}
          onClick={toggleComplete}
        >
          {todo.title}
        </p>
      ))}
    </div>
  );
}

export default TodoList;
1
2
3
4
5
6
7
8
9
10
11
12
13
14
15
16
17
18
19
20
21
22
23
24
25
26
27
28
29
30
31
32
33
34
35
36
37
38
39
40
41
42
43
44
45
46
47
48
49
50
51
52
53
54
55
56
57
58
59
60
61
62
63
64
65
66
67
68
2
3
4
5
6
7
8
9
10
11
12
13
14
15
16
17
18
19
20
21
22
23
24
25
26
27
28
29
30
31
32
33
34
35
36
37
38
39
40
41
42
43
44
45
46
47
48
49
50
51
52
53
54
55
56
57
58
59
60
61
62
63
64
65
66
67
68
- これで入力された内容がTodoListの末尾に追加されるようになった
- 入力した内容が残り続けないように、空文字をセットすることでフォームをリセットしている

# まとめ
useStateはStateとして配列も管理することができる.mapをうまく活用することで配列を繰り返し処理で画面に表示することができるuseRefを使って入力域とフィールドを紐付けることで入力内容を取得することができる
← 4.Counter編 6.ページ遷移編 →